We played with friends one day this week and did some crafts we had been wanting to do.
Amy mixed up some "snow". It just took a few ingredients: corn starch, shaving cream, and glitter.
Isabella LOVES to mash her hands in things, so this was a great activity for her. It made a HUGE mess, but I threw down this cheap plastic table cloth and it was easy to clean up. It was all over the floor (on Isabella's side of the table), but that's a part of fun sometimes, right?
Amy cut out shapes so the girls could make snowmen, and hide different shapes in the snow and do shape recognition. (Someone used to teach kindergarten and it wasn't me. :) )
We traced the girls hands and made these salt dough Santa hand ornaments we had wanted to make. The girls played together really great while we were making these.
The last thing we did was an edible Christmas tree. I had green for the icing, but the girls wanted pink, so they had pink trees.
Decorating her tree.
Kaitlyn's face and hands were completely clean...and this is how Isabella looked. :)
Showing posts with label Crafts. Show all posts
Saturday, December 15, 2012
Wednesday, December 05, 2012
Old news
I have a back log of blogs to catch up on, so this will all be old news for a while.
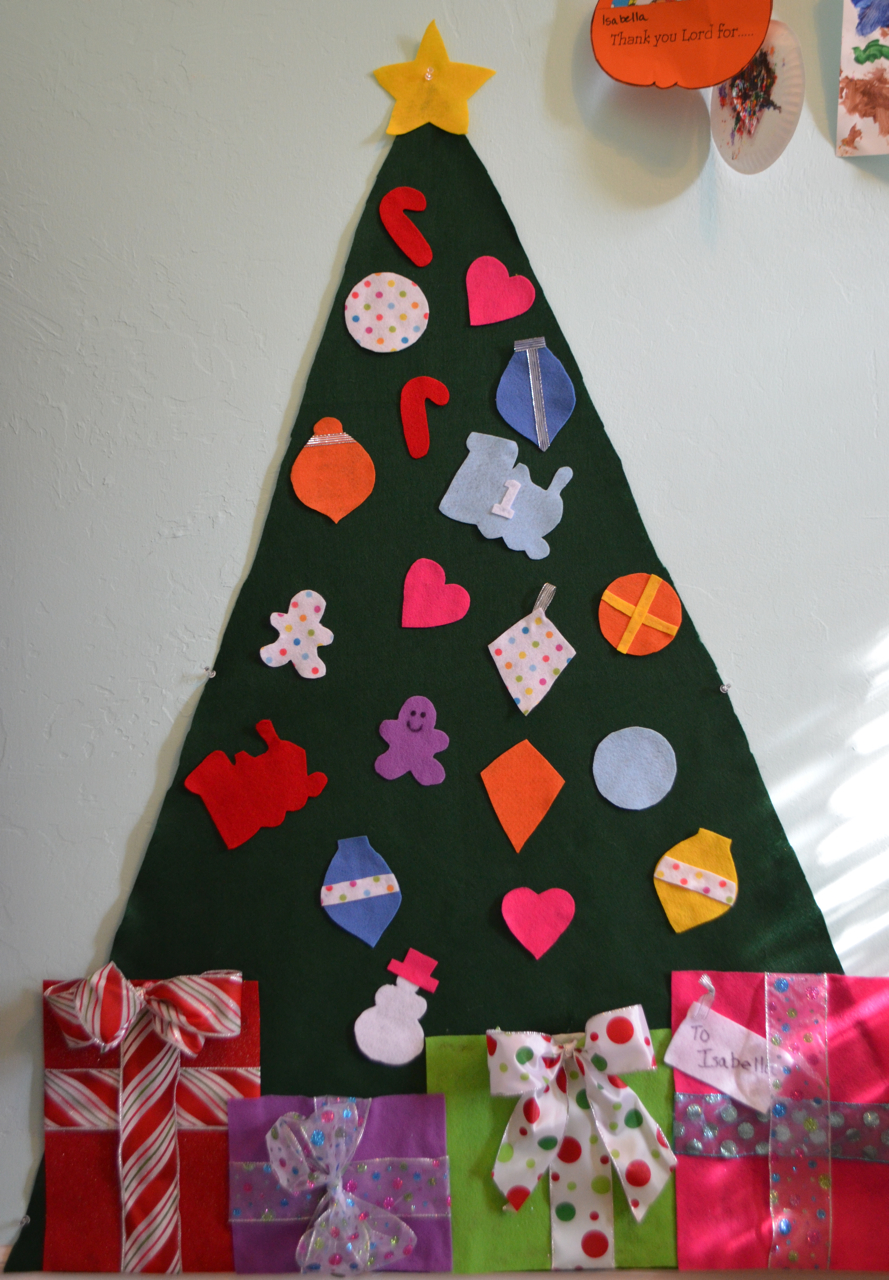
For the past few years I have hung out with my mom the Wednesday before Thanksgiving while Michael goes fishing. We have made pies or something for thanksgiving in the past, but this year we made this felt tree for Isabella I had been wanting to make.
My mom is much better at crafting than me, so I knew it would turn out better with her help. I got all of the supplies at hobby lobby and all in all it was a pretty cheap craft to make.
I hung it in the play room when we got home, and Isabella decorated her tree after her nap.
Michael carving the turkey at my mom's house.
This was the extent of pictures I took on Thanksgiving with a non-iPhone camera, and it's not even a good one. No pictures of family or cute ones of Isabella. Whomp whomp. Oh well!
Isabella napping after Thanksgiving lunch.
Thursday morning I got up to finish the cooking I needed to do, and mixed up some cinnamon rolls. We ate breakfast and watched the parade then got ready to spend the rest of the day with our families. Other than spending time with our families my thanksgiving favorites this year were making the pie with Isabella and watching the parade with her. I have always loved watching the Macy's Thanksgiving parade and it is fun to have a child to share that with now!
For the past few years I have hung out with my mom the Wednesday before Thanksgiving while Michael goes fishing. We have made pies or something for thanksgiving in the past, but this year we made this felt tree for Isabella I had been wanting to make.
My mom is much better at crafting than me, so I knew it would turn out better with her help. I got all of the supplies at hobby lobby and all in all it was a pretty cheap craft to make.
I hung it in the play room when we got home, and Isabella decorated her tree after her nap.
I was really happy with how it turned out.
We had a lot of fun making our pie together that afternoon.
This was the extent of pictures I took on Thanksgiving with a non-iPhone camera, and it's not even a good one. No pictures of family or cute ones of Isabella. Whomp whomp. Oh well!
Isabella napping after Thanksgiving lunch.
Thursday morning I got up to finish the cooking I needed to do, and mixed up some cinnamon rolls. We ate breakfast and watched the parade then got ready to spend the rest of the day with our families. Other than spending time with our families my thanksgiving favorites this year were making the pie with Isabella and watching the parade with her. I have always loved watching the Macy's Thanksgiving parade and it is fun to have a child to share that with now!
Friday, November 09, 2012
I was at the grocery store at the beginning of this week and saw a bag of mini pumpkins marked down to $1. I didn't get my glitter pumpkins made last year, as I usually do, so I decided to make it happen. I was feeling really good at the beginning of the week- almost normal- so I was happy to do some things this week I had been wanting to do.
I don't love how my branches turned out- but I decided it was good enough. We've been writing down something we are thankful when we are at the table together. I'm looking forward to this new tradition to document the things we were grateful for each year during the thanksgiving season and help foster thankfulness with our children.
I also felt up to making bread after a 3 month hiatus and cooked a few meals this week. It was big time!
My bread making helper.
I've had some not as good days toward the end of the week, but enjoyed a burst of feeling better. Hopefully that means my morning sickness is almost over. (And really? Morning sickness? Its more like random sickness in the middle of the night, afternoon sickness, evening sickness, whenever-it-wants-to-sickness.) I've got some house projects that need to be tackled...hopefully soon!
YAY!
Last year I had seen a thankful tree on a blog I read, but never got around to making it. So when she posted the free printables again this week, I decided this was the year to start a new tradition.
I don't love how my branches turned out- but I decided it was good enough. We've been writing down something we are thankful when we are at the table together. I'm looking forward to this new tradition to document the things we were grateful for each year during the thanksgiving season and help foster thankfulness with our children.
I also felt up to making bread after a 3 month hiatus and cooked a few meals this week. It was big time!
My bread making helper.
I've had some not as good days toward the end of the week, but enjoyed a burst of feeling better. Hopefully that means my morning sickness is almost over. (And really? Morning sickness? Its more like random sickness in the middle of the night, afternoon sickness, evening sickness, whenever-it-wants-to-sickness.) I've got some house projects that need to be tackled...hopefully soon!
Thursday, April 26, 2012
April Project
For my April project I wanted to make a shirt skirt that I had seen a tutorial for last year. I had a sewing day with my sister and SIL and we attempted these skirts. While the tutorial says its a 30 minute skirt, it was more like a 4 hour project for us! I am not an experienced seamstress, so it was very slow going. Michael had a huge bag full of t-shirts he was getting rid of, so we used those. You cut the shirt right under the sleeves. Then you sew 12-15 rows around the top of the shirt, using elastic thread in your bobbin to shirr the top part of the skirt.
I picked an old blue shirt.
My finished product
I picked an old blue shirt.
My finished product
(And obviously I should have turned off my flash when taking a picture in a mirror).
Now that I've done it once, I *think* I could get another one done more quickly. I have a really soft yellow shirt, I want to use to make another one.
I still haven't done March's project, but here are the others:
January- Homemade Laundry Soap
February- Whole wheat sandwich bread
Tuesday, January 17, 2012
Michael was out of town yesterday until late so Isabella and I hung out at my parents house in the evening. My mom got stuff for us to make a valentines banner. (My love for all things holiday came from her.) You need paper, wooden letters, glue, and tinsel or string.

Trace your letters on the paper you want to use and cut them out. Then glue the paper on top of the letters.
Be careful if the paper has a pattern that you reverse your letters so they go the correct way. I messed this up a few times.

Hot glue letters to your string.

And hang! Thanks Mom!

Trace your letters on the paper you want to use and cut them out. Then glue the paper on top of the letters.
Be careful if the paper has a pattern that you reverse your letters so they go the correct way. I messed this up a few times.

Hot glue letters to your string.

And hang! Thanks Mom!
Wednesday, December 21, 2011
Creating
Here is some of what I've been up to lately:

This past rainy Monday, Beth and I made paper snowflakes. It was my first time to make some. It seems like that should be an elementary school graduation requirement!

I strung them on some green ric rac.

I had a photo I wanted to make an ornament out of so I started looking online. But the ones I looked at online were $12-30 and I wanted several. So I thought I would try to make some. I found these clear ornaments at Michael's for .79. Then I just added some glitter, photo with cardstock on the back, and a string to hang!

I made a snow globe for a gift card that I'm giving. I'd seen this on a website and gave it a try.

I decided to make some more cinnamon rolls to give as gifts. Who doesn't like some ready to go cinnamon rolls in the freezer? (Except the ones that I baked a bit too long!)

And lastly, I'd seen some jars like these from Anthropologie for $25 or so. I saw someone had made some on pinterest and gave them a try. I still need to find a large mason jar to use and add a little more snow.
That's it. My next project needs to involve wrapping up our gifts. One step at a time!
This past rainy Monday, Beth and I made paper snowflakes. It was my first time to make some. It seems like that should be an elementary school graduation requirement!
I strung them on some green ric rac.

I had a photo I wanted to make an ornament out of so I started looking online. But the ones I looked at online were $12-30 and I wanted several. So I thought I would try to make some. I found these clear ornaments at Michael's for .79. Then I just added some glitter, photo with cardstock on the back, and a string to hang!
I made a snow globe for a gift card that I'm giving. I'd seen this on a website and gave it a try.
I decided to make some more cinnamon rolls to give as gifts. Who doesn't like some ready to go cinnamon rolls in the freezer? (Except the ones that I baked a bit too long!)
And lastly, I'd seen some jars like these from Anthropologie for $25 or so. I saw someone had made some on pinterest and gave them a try. I still need to find a large mason jar to use and add a little more snow.
That's it. My next project needs to involve wrapping up our gifts. One step at a time!
Sunday, November 15, 2009
Burp Cloths
I have several friends who are pregnant right now and I wanted to make something to go with my shower gifts. My knitting skills are about 15 years rusty, I don't really paint, I have a sewing machine but I'm not really sure how to use it... so I wasn't sure what to try.
After thinking about this for a while I decided to make some burp cloths. I have a friend who got some really cute ones at a shower a while ago. I read about it online and it sounded really easy so I gave it a try this weekend as I have a baby shower to go to next weekend.

From my research online, it is best to use Gerber cloth diapers that are the prefold type. You need to wash them first in hot water and dry them so they will shrink up before you sew them.
Then pick out a variety of ribbons, fabric, ric rac. etc to sew on.

My mom made this first one to show me how to use the machine. For this one we sewed ribbons long way on the diaper with a thicker ribbon along the bottom.

To put the ribbon on the bottom secure with pins and sew across.

The first two finished

I was pretty happy with them for my first try. I am going to get initials monogrammed on them also. I think girl colors will be cuter, so I am excited to try those.
After thinking about this for a while I decided to make some burp cloths. I have a friend who got some really cute ones at a shower a while ago. I read about it online and it sounded really easy so I gave it a try this weekend as I have a baby shower to go to next weekend.

From my research online, it is best to use Gerber cloth diapers that are the prefold type. You need to wash them first in hot water and dry them so they will shrink up before you sew them.
Then pick out a variety of ribbons, fabric, ric rac. etc to sew on.

My mom made this first one to show me how to use the machine. For this one we sewed ribbons long way on the diaper with a thicker ribbon along the bottom.

To put the ribbon on the bottom secure with pins and sew across.

The first two finished

I was pretty happy with them for my first try. I am going to get initials monogrammed on them also. I think girl colors will be cuter, so I am excited to try those.
Sunday, October 18, 2009
Glitter pumpkins
We made our glitter pumpkins this weekend, and I was glad because last year I bought the pumpkins, but never got around to making them. Here is a little demonstration:

You need small pumpkins, glue- (I use "tacky" glue), fine glitter, brushes, and newspapers.

Brush the glue over 3/4 of the pumpkin (leaving the bottom for it to sit to dry)

Cover with glitter. When you are finished you will use the newspaper as a funnel to put the excess glitter back in the bottle.

More gluing

Green glitter

Leave for a few hours to dry. When dry you will turn them over and do the bottom of the pumpkin and then let that dry for a few hours.

And display! Happy Fall!

You need small pumpkins, glue- (I use "tacky" glue), fine glitter, brushes, and newspapers.

Brush the glue over 3/4 of the pumpkin (leaving the bottom for it to sit to dry)

Cover with glitter. When you are finished you will use the newspaper as a funnel to put the excess glitter back in the bottle.

More gluing

Green glitter

Leave for a few hours to dry. When dry you will turn them over and do the bottom of the pumpkin and then let that dry for a few hours.

And display! Happy Fall!
Subscribe to:
Posts (Atom)